Hits: 10
Have you ever wondered why your subjects turn yellow when taking photos indoors? Or why is your camera flash making them blue? A thorough understanding of the concept of white balance and how it works is critical in digital photography, as incorrect selection can severely discolor a photo, add unwanted color patterns, and cause skin tones to look unnatural.
In this article we explain what is called White Balance (WB), how we can adjust the white balance on our camera or in post production to get accurate colors.
What is white balance?
White balance definition: In its simplest sense, white balance in digital photography means adjusting colors to make images look more natural. When we take a photo and look at it, we need to adjust the colors to match what we see with our eyes in the scene. Why do we have to do this? Since most light sources such as the sun, lightbulbs, flashlights etc. do not emit a completely white color and not all have the same “color temperature”.
The human brain processes information from our eyes and automatically adjusts the color temperature so that we can see colors at their natural temperature and accurately. Most people, however, don‘t notice much of a difference in color temperature between bright sunlight and indoor tungsten light.
If you‘re a skier or snowboarder, try the following: Put on your ski goggles and look at the snow. The hue changes. If you have ski goggles with a yellow tint, the snow will appear yellowish. But after you‘ve done a little skiing, your eyes and brain will adjust to the color and the snow will appear white again. If you take off your ski goggles after skiing, the snow will be more bluish than white until your brain returns to normal colors. This example shows that we are equipped with a very sophisticated color system that automatically adjusts colors in different lighting situations.
While our brains automatically process colors for us in such an intelligent way, digital cameras can predict color temperature simply by monitoring the ambient temperature. In most cases, modern digital cameras are quite good at predicting this, but in some cases they make mistakes. Because of these errors, some photos may appear bluish or yellowish, and skin tones may look unnatural.


Here is an example of white balance, both right and wrong:
As you can see, the picture on the left looks more natural and the skin color is correct, while the picture on the right is very blue. The second image clearly needs to be adjusted to white balance to get rid of these tones.
The main purpose of accurate white balance is to make your subjects appear as natural and neutral as possible. There is nothing disturbing than looking at a distorted color photo, it irritates the eye. None of us want to see our photos in extreme and unnatural colors like orange, blue and green. People will look at photos that look natural and pleasing to the eye.
Color temperature and color measurement
What do you know about color temperature? When shopping, have you ever noticed that there are many different ways to buy a lightbulb for your home? Soft white, bright white, daylight? Have you ever learned that the light differs from other lightbulbs in your home after you buy one and return home? This is due to the color temperature of the light bulbs.
Each light source has its own „color temperature“ and the color temperature is measured in Kelvin and indicated by the K symbol. Soft white lamps 2,700-3,000K, bright white or cool white 3,500-4,100K and daylight lamps 5,000-6,500K. 5500K is considered the color temperature level for daylight. The candlelight is at the lower end of the Kelvin spectrum at 1,900 K and the light blue sky is at the upper end of the Kelvin spectrum at 10,000 K.
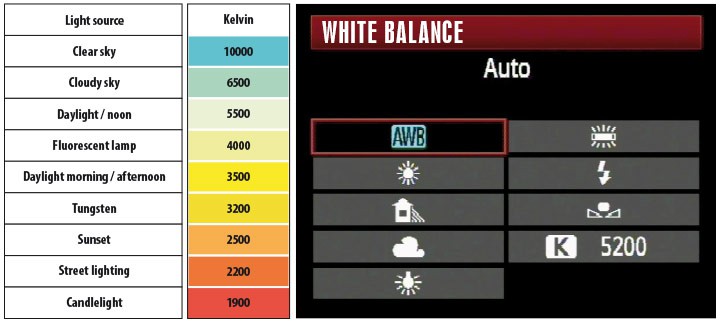
For our purposes, we need to know that lower lighting and indoor lighting conditions typically have lower Kelvin numbers and brighter lighting conditions typically have higher Kelvin numbers. The lower the Kelvin number, the more yellow the light, the higher the Kelvin number, the bluer the light. The following table gives you an idea of where the various lighting situations are on the Kelvin scale. These aren‘t exact numbers, but they will help you get a general idea of where your lighting levels are on the Kelvin scale. Most of the time you will see a typical daylight value like „5,500 K“.
Low color temperatures, i.e. candlelight and incandescent lamp, shift towards the red part of the sunrise / sunset color spectrum. That is why we call these colors „warm“. High color temperatures, i.e. lightning, cloudy skies, shadows shift towards the blue part of the color spectrum, which is why we call these colors „cold“.
If your camera‘s White Balance setting is set to Auto, it will attempt to estimate the Kelvin value based on a white object as a reference point. For example, white clouds in a scene are used as a white reference point and the rest of the colors are matched to that reference color. This type of calculation does not always give good results, especially if the scene you are photographing does not contain pure white or only one color dominates. In such cases, you may need to manually set the correct white balance on your camera or during post production.
Should you change the white balance setting in the camera or in post-production?
In order for our cameras to take pictures as we see them with our eyes, we have to give them the camera information about the lighting conditions that we are recording. As we said before, our brains are able to compensate for different color temperatures, but our cameras need a little extra help. Understanding white balance will allow you to adjust your camera to the lighting conditions you are shooting and make additional adjustments if necessary.
The Kelvin setting on your camera should match the lighting conditions you are in. If you‘re shooting by candlelight, your Kelvin setting should be around 1,900K. If you are shooting with cloudy skies during the day, your setting should be 6,500K. By defining the color temperature of the lighting conditions under which you take a photo on your camera, you can be sure that the images from your camera will look exactly like the ones you see with your eyes.
One of the great things about digital photography is that we no longer have to use gray cards and color grading filters to get accurate colors. When shooting in RAW format, the RAW image can be converted to any white balance as this information is stored for reference only and the original image is left untouched and processed by the camera. This means you can shoot in any white balance mode and ignore the settings as long as you‘re shooting in RAW.
I always set my camera‘s white balance to “Auto” and let my camera predict the correct colors. If my camera can‘t predict the correct white balance, I can change it in Lightroom and manually adjust the new setting my photo needs. If you set your camera to RAW, set this setting to “Auto”. This is one of the main advantages between RAW and JPEG difference in favor of RAW recordings.
But what if you don‘t use RAW and record JPEG? Then you need to learn very well how to use gray cards and how to adjust the white balance in your camera. While in most cases your camera can predict color temperatures pretty well, there can be situations where the lighting conditions can mislead your camera‘s metering system and give you poor colors. In such cases, you will need to manually adjust your camera‘s white balance.
How do I change the white balance in the camera?
The process for changing the white balance in a digital camera varies from manufacturer to manufacturer and model to model. Most digital cameras have a „WB“ button on the top; some cameras may have a „WB“ button on the back of the camera near the LCD screen. With some enclosures, you can only make this setting via the menu. If for some reason you cannot find your camera‘s setting, we recommend reading your camera‘s manual.
Preset white balance settings
Most DSLR cameras available have white balance presets that have been set to a specific Kelvin number by the manufacturer. These presets also vary depending on the manufacturer and camera model. List of presets for most Nikon DSLR cameras:
- Auto “A” – This is the setting I always use as the default white balance when shooting RAW. The camera automatically estimates the white balance based on the ambient light and flash consumption.
- Tungsten
 – Be sure to use this setting if you are in an environment with tungsten lamps or your photo will look too blue.
 - Fluorescent
 – Use this option if your photos look too green or under fluorescent lighting.
 - Direct Sunlight
 – Used when taking photos outdoors in sunlight.
 - Flash
 – Used when using the camera flash.
 - Cloudy
 – Use on cloudy days or in the shade. There are warmer images than sunlight.
 - Shadows
 – For sunsets and shadows.
 - Continuous Variable
 – Allows you to manually change the Kelvin value from 2,500 to 10,000.
 - Presetting„PRE“ – For color matching with the gray card.
The above list may be different for your camera. I am giving this information for reference only. It is best to refer to the user manual mentioned earlier.
The best way to get the right white balance is to use the Preset (PRE) setting. Hold a white card in front of the lens and press the shutter button. The camera then reads the correct color temperature of the light reflected from the gray card and uses this value.
Warm = high, cool = low
An easy way to remember which way to set your Kelvin degrees is to think in the same way as the air temperature. Remember that the higher numbers on the thermometer mean hot, lower numbers mean cooler temperatures. When it comes to Kelvin adjustment for white balance in your camera, set the number higher if the image needs to be “heated” and lower the number if the image needs to be “cooled”.
How do I change the white balance in Lightroom?
It‘s easy to change the white balance presets in Lightroom. In the “Library” module, look at the right control panel and select a preset from the “White Balance” drop-down menu in the “Quick Enhancement” menu setting (see below):
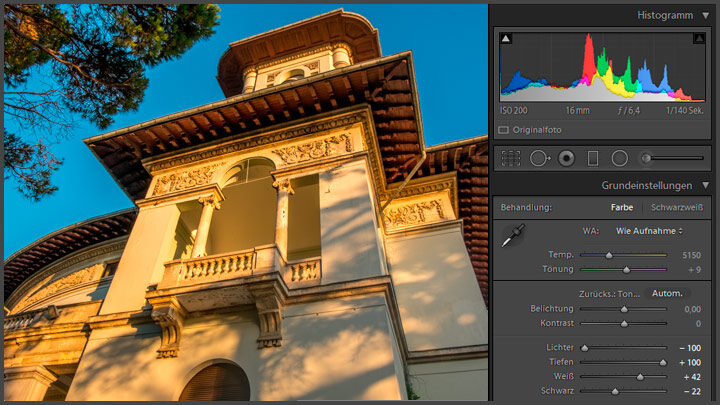
If you want, you can adjust the color temperature and tone yourself in Lightroom. Switch to the “Extend” module and look in the “Basic” menu. You can enter the color temperature / hue in the field next to it or change the scale with the mouse.
Summary
To get the correct white balance in your photos, you need to give your camera enough information about the lighting conditions. If you‘re just starting out, using the Automatic setting is a surefire way to get good results. When you switch to manual settings with aperture, shutter speed, and ISO settings, you‘ll want more control over your white balance settings by adjusting your Kelvin degrees. Keep that in mind. Move the number up if you want to „heat“ the image. Move the number down if the image needs to be „chilled“.
Adjusting the white balance, like the exposure, is a very personal and subjective decision. There is no absolute truth when it comes to coloring your photos. It‘s simple for me: I want my photos to match what the human eye sees in the scene. This means that in most cases the photo will look as natural as possible.
If you enjoyed this article, take a look at my photography tips page. You will find many photography topics that you can relate to not just for today but also for the future.
If you have any opinions, experiences, or comments about white balance, please let me know in the „Comments“ section below.

